正在合并
分支用来维护独立的开发支线,在一些阶段,你可能需要将分支上的修改合并到最新版本,或者将最新版本的修改合并到分支。
It
is important to understand how branching and merging works in
Subversion before you start using it, as it can become quite complex.
It is highly recommended that you read the chapter Branching and Merging in the Subversion book, which gives a full description and many examples of how it is used.
The next point to note is that merging always takes place within a working copy. If you want to merge changes into
a branch, you have to have a working copy for that branch checked out,
and invoke the merge wizard from that working copy using TortoiseSVN →
Merge….
通常来说,在没有修改的工作副本上执行合并是一个好想法。如果你在工作副本上做了修改,请先提交。如果合并没有按照你的想法执行,你可能需要撤销这些修改,命令恢复 会丢弃包含你执行合并之前的所有修改。
There
are three common use cases for merging which are handled in slightly
different ways, as described below. The first page of the merge wizard
asks you to select the method you need.
合并版本范围
这个方法覆盖了你已经在分支(或者最新版本)上做出了一个或多个修改,并且你想将这些修改应用到不同分支的情况。
What
you are asking Subversion to do is this: “Calculate the changes
necessary to get [FROM] revision 1 of branch A [TO] revision 7 of
branch A, and apply those changes to my working copy (of trunk or
branch B).”复兴分支
This method covers the
case when you have made a feature branch as discussed in the Subversion
book. All trunk changes have been ported to the feature branch, week
by week, and now the feature is complete you want to merge it back into
the trunk. Because you have kept the feature branch synchronized with
the trunk, the latest versions of branch and trunk will be absolutely
identical except for your branch changes.This is a special case
of the tree merge described below, and it requires only the URL to
merge from (normally) your development branch. It uses the
merge-tracking features of Subversion to calculate the correct revision
ranges to use, and perform additional checks which ensure that the
branch has been fully updated with trunk changes. This ensures that you
don't accidentally undo work that others have committed to trunk since
you last synchronized changes.After the merge, all branch
development has been completely merged back into the main development
line. The branch is now redundant and can be deleted.合并两个不同的树
This
is a more general case of the reintegrate method. What you are asking
Subversion to do is: “Calculate the changes necessary to get [FROM] the
head revision of the trunk [TO] the head revision of the branch, and
apply those changes to my working copy (of the trunk).” The net result
is that trunk now looks exactly like the branch.If your
server/repository does not support merge-tracking then this is the only
way to merge a branch back to trunk. Another use case occurs when you
are using vendor branches and you need to merge the changes following a
new vendor drop into your trunk code. For more information read the
chapter on vendor branches in the Subversion Book.
合并指定版本范围
图 5.35. 合并向导 – 选择版本范围

In the From: field enter the full folder URL of the branch or tag
containing the changes you want to port into your working copy. You may
also click … to browse the repository and find the desired branch.
If you have merged from this branch before, then just use the drop down
list which shows a history of previously used URLs.
In the
Revision range to merge field enter the list of revisions you want to
merge. This can be a single revision, a list of specific revisions
separated by commas, or a range of revisions separated by a dash, or
any combination of these.
The easiest way to select the range of
revisions you need is to click on Show Log, as this will list recent
changes with their log comments. If you want to merge the changes from a
single revision, just select that revision. If you want to merge
changes from several revisions, then select that range (using the usual Shift-modifier). Click on OK and the list of revision numbers to merge will be filled in for you.
If you want to merge changes back out
of your working copy, to revert a change which has already been
committed, select the revisions to revert and make sure the Reverse
merge box is checked.
如果你已经从这个分支合并了一些修改,希望你在提交日志中注明最后一个合并的版本号。这时,你可以在工作服本上使用显示日志对话框跟踪日志。使用最后合并的版本号作为本次合并的开始版本。例如,你已经合并了版本37到39,那么本次合并你应该从版本39开始。
If
you are using the merge tracking features of Subversion, you do not
need to remember which revisions have already been merged – Subversion
will record that for you. If you leave the revision range blank, all
revisions which have not yet been merged will be included. Read “合并跟踪”一节 to find out more.
如果其他用户可能提交,那么要小心使用最新版本。如果有人在你最近更新之后提交了,它指代的版本可能就不是你想的那样了。
点击 下一步 进入 “合并选项”一节
复兴分支
图 5.36. The Merge Wizard – Reintegrate Merge
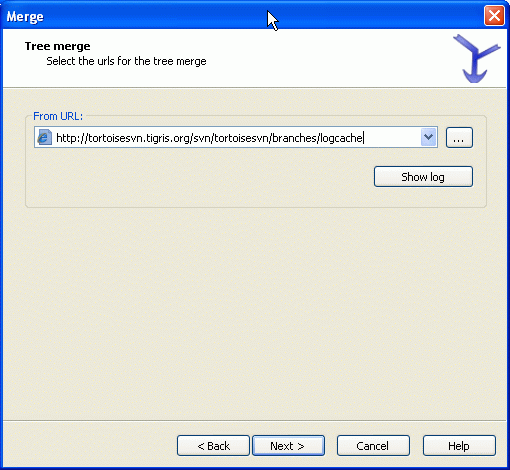
To merge a feature branch back into the trunk you must start the merge wizard from within a working copy of the trunk.
In
the From URL: field enter the full folder URL of the branch that you
want to merge back. You may also click … to browse the repository.
There
are some conditions which apply to a reintegrate merge. Firstly, the
server must support merge tracking. The working copy must be of depth
infinite (no sparse checkouts), and it must not have any local
modifications, switched items or items that have been updated to
revisions other than HEAD. All changes to trunk made during branch
development must have been merged across to the branch (or marked as
having been merged). The range of revisions to merge will be calculated
automatically.
合并两个不同的目录树
图 5.37. 合并向导 – 树合并
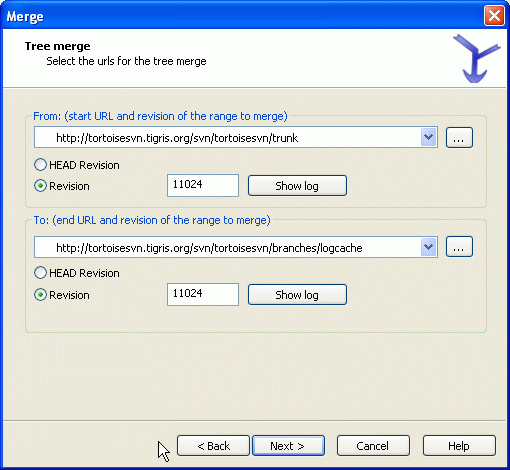
If you are using this method to merge a feature branch back to trunk,
you need to start the merge wizard from within a working copy of trunk.
In the From: field enter the full folder URL of the trunk.
This may sound wrong, but remember that the trunk is the start point
to which you want to add the branch changes. You may also click … to
browse the repository.
在到:域输入关注的分支中文件夹的全路径。
在开始版本和结束版本 域,输入两个树被同步的最后一个版本号。如果你确信没有其他人提交,两个都可是输入 HEAD。如果在同步时可能有人提交的话,使用清楚的版本号以便面丢失最新提交。
也可以使用 显示日志 选择版本。
合并选项
This
page of the wizard lets you specify advanced options, before starting
the merge process. Most of the time you can just use the default
settings.
You can specify the depth to use for the merge, i.e.
how far down into your working copy the merge should go. The depth
terms used are described in “检出深度”一节. The default depth is Working copy, which uses the existing depth setting, and is almost always what you want.
Most
of the time you want merge to take account of the file's history, so
that changes relative to a common ancestor are merged. Sometimes you
may need to merge files which are perhaps related, but not in your
repository. For example you may have imported versions 1 and 2 of a
third party library into two separate directories. Although they are
logically related, Subversion has no knowledge of this because it only
sees the tarballs you imported. If you attempt to merge the difference
between these two trees you would see a complete removal followed by a
complete add. To make Subversion use only path-based differences rather
than history-based differences, check the Ignore ancestry box. Read
more about this topic in the Subversion book, Noticing or Ignoring Ancestry
You can specify the way that line ending and whitespace changes are handled. These options are described in “行结束符和空白选项”一节. The default behaviour is to treat all whitespace and line-end differences as real changes to be merged.
If
you are using merge tracking and you want to mark a revision as having
been merged, without actually doing the merge here, check the Only
record the merge checkbox. There are two possible reasons you might
want to do this. It may be that the merge is too complicated for the
merge algorithms, so you code the changes by hand, then mark the change
as merged so that the merge tracking algorithm is aware of it. Or you
might want to prevent a particular revision from being merged. Marking
it as already merged will prevent the merge occurring with
merge-tracking-aware clients.
Now everything is set up, all you
have to do is click on the Merge button. If you want to preview the
results Test Merge performs the merge operation, but does not modify the working copy at all. It shows you a list of the files that
will be changed by a real merge, and notes those areas where conflicts
will occur.
The merge progress dialog shows each stage of the
merge, with the revision ranges involved. This may indicate one more
revision than you were expecting. For example if you asked to merge
revision 123 the progress dialog will report “Merging revisions 122
through 123”. To understand this you need to remember that Merge is
closely related to Diff. The merge process works by generating a list
of differences between two points in the repository, and applying those
differences to your working copy. The progress dialog is simply
showing the start and end points for the diff.
预览合并结果
The
merge is now complete. It's a good idea to have a look at the merge
and see if it's as expected. Merging is usually quite complicated.
Conflicts often arise if the branch has drifted far from the trunk.
For
Subversion clients and servers prior to 1.5, no merge information is
stored and merged revisions have to be tracked manually. When you have
tested the changes and come to commit this revision, your commit log
message should always include the revision numbers which have
been ported in the merge. If you want to apply another merge at a
later time you will need to know what you have already merged, as you
do not want to port a change more than once. For more information about
this, refer to Best Practices for Merging in the Subversion book.
如果你的服务器和所有客户端都使用 Subversion 1.5 或更高版本,合并跟踪工具会记录已经合并的版本,避免某个版本被合并多次。它会使你的生活更简单,因为你每次都可以简单的合并全部版本范围,并且知道只有新版本才会实际被合并。
分支管理很重要。如果你要保持这个分支与最新版本同步,你应当经常合并,这样分支和最新版本的差别就不会太大。当然,你仍旧应该遵循上面的说明,避免重复合并修改。
提示
If
you have just merged a feature branch back into the trunk, the trunk
now contains all the new feature code, and the branch is obsolete. You
can now delete it from the repository if required.
重要
Subversion
can't merge a file with a folder and vice versa – only folders to
folders and files to files. If you click on a file and open up the
merge dialog, then you have to give a path to a file in that dialog. If
you select a folder and bring up the dialog, then you must specify a
folder URL for the merge.
合并跟踪
Subversion 1.5 引入了合并跟踪特性。当你合并版本树时,版本号会被保存,此信息可以用于几个目的。
You
can avoid the danger of merging the same revision twice (repeated
merge problem). Once a revision is marked as having been merged, future
merges which include that revision in the range will skip over it.When
you merge a branch back into trunk, the log dialog can show you the
branch commits as part of the trunk log, giving better traceability of
changes.When showing blame information for a file, you can
choose to show the original author of merged revisions, rather than the
person who did the merge.You can mark revisions as do not merge by including them in the list of merged revisions without actually doing the merge.
Merge tracking information is stored in the svn:mergeinfo
property by the client when it performs a merge. When the merge is
committed the server stores that information in a database, and when
you request merge, log or blame information, the server can respond
appropriately. For the system to work properly you must ensure that the
server, the repository and all clients are upgraded. Earlier clients
will not store the svn:mergeinfo property and earlier servers will not provide the information requested by new clients.
Find out more about merge tracking from Subversion's Merge tracking documentation.
子合并期间处理冲突
Merging
does not always go smoothly. Sometimes there is a conflict, and if you
are merging multiple ranges, you generally want to resolve the
conflict before merging of the next range starts. TortoiseSVN helps you
through this process by showing the merge conflict callback dialog.
图 5.38. 合并冲突回调对话框
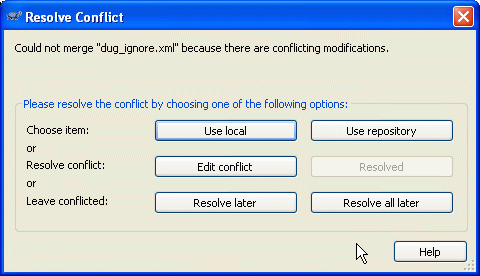
When a conflict occurs during the merge, you have three ways to handle it.
You
may decide that your local changes are much more important, so you
want to discard the version from the repository and keep your local
version. Or you might discard your local changes in favour of the
repository version. Either way, no attempt is made to merge the changes
– you choose one or the other.Normally you will want
to look at the conflicts and resolve them. In that case, choose the Edit
Conflict which will start up your merge tool. When you are satisfied
with the result, click Resolved.The last option is to
postpone resolution and continue with merging. You can choose to do
that for the current conflicted file, or for all files in the rest of
the merge. However, if there are further changes in that file, it will
not be possible to complete the merge.
合并全部修改
If
you want to merge all changes from trunk to the branch you are
currently working on, then you can use the TortoiseSVN → Merge all…
from the extended context menu (hold down the Shift key while you right click on the file).
图 5.39. 合并全部对话框
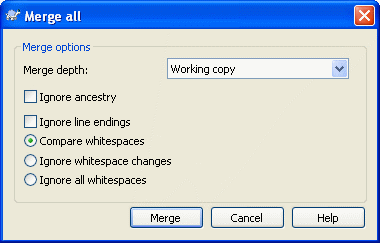
This dialog is very easy. All you have to do is set the options for the merge, as described in “合并选项”一节. The rest is done by TortoiseSVN automatically using merge tracking.
If
you use this feature you must be sure that all clients are using merge
tracking, otherwise the merge history may be incomplete. Also, if the
server does not have a merge tracking database, gathering the
information will be very slow.